How To Upgrade To Raspberry Pi OS 11 Bullseye (From Buster)
Raspberry Pi OS "Bullseye" (based on Debian 11 Bullseye) has been released recently, and this article covers the instructions for upgrading from the older Raspberry Pi OS Buster to this new Bullseye version. This should work with any Raspberry Pi model.
Raspberry Pi OS Bullseye comes with major changes, including:
- It now uses GTK3 instead of GTK2
- Replaced Openbox window manager with Mutter on systems with more than 2GB of RAM (if your RPi has 2GB of RAM or less, it will continue to use Openbox)
- A new notification manager is available in the taskbar; notifications are now displayed in chronological order in the top right corner of the screen, and are hidden after fifteen seconds (they can be configured from
Panel Preferences -> Appearance) - New graphical tool to install system and application updates
- The KMS (kernel modesetting) driver, which was an experimental option until now, is now the standard video driver
- New camera driver
- Many other changes, including Chromium browser updated to version 92 (optimized to support hardware accelerated video playback on the Raspberry Pi)
It's worth noting from the start that upgrading Raspberry Pi OS from Buster (based on Debian 10 Buster) to Bullseye (based on Debian 11 Bullseye) is not officially supported because there are important changes between major Debian version upgrades, and the recommended way to get it is to create a new SD card with the new release. The system may break (some things may not work, it may not be able to boot, etc.) when upgrading! Also, it will take considerably longer to upgrade to Raspberry Pi OS Bullseye than to perform a clean installation.
However, I for one have a heavily customized Raspberry Pi OS and I wanted to keep my customizations, so I opted to upgrade from Buster to Bullseye. In case you want to upgrade too, below you have all the steps required to upgrade Raspberry Pi OS 10 Buster to 11 Bullseye, as well as some issues I've encountered during / after the upgrade, and solutions. While this should work with any Raspberry Pi model, note that I tested this on a Raspberry Pi 4.
You might also like: How To Cast YouTube Videos From Your Phone To Raspberry Pi Using YouTube On TV (youtube.com/tv)
How to upgrade Raspberry Pi OS 10 Buster to 11 Bullseye
1. Back up your current installation in case the OS is messed up after the upgrade, and you want to revert it to its initial state. The easiest way to do this is to use the SD Card Copier tool that comes preinstalled with Raspberry Pi OS (it's available in the menu, in the Accessories category).
2. Search and replace all instances of buster with bullseye in /etc/apt/sources.list and /etc/apt/sources.list.d/raspi.list
You can either do this manually, using a text editor, or use the commands below to do this:
sudo sed -i 's/buster/bullseye/g' /etc/apt/sources.list
sudo sed -i 's/buster/bullseye/g' /etc/apt/sources.list.d/raspi.list3. Update the software sources, install gcc-8 (the upgrade can't continue without it), then upgrade your Raspberry Pi OS from Buster to Bullseye.
sudo apt update
sudo apt install libgcc-8-dev gcc-8-base
sudo apt full-upgradeWithout installing gcc-8, you'll get an error when trying to run sudo apt full-upgrade, saying that "Some packages could not be installed. [...] The following packages have unmet dependencies: libc6-dev : Breaks: libgcc-8-dev (< 8.4.0.2~) but 8.3.0-6+rpi1 is to be installed".
At the end of the apt full-upgrade command, I received the following warning: "APT had planned for dpkg to do more than it reported back...". If you encounter this issue too, this should fix it:
sudo apt install -f
sudo apt full-upgradeAfter this, everything was upgraded successfully.
4. Remove leftover packages
sudo apt autoremove5. Enable KMS. This is now used by default when using a fresh Raspberry Pi OS Bullseye image, but not when upgrading from Buster to Bullseye - in this case we need to enable it manually (without it you'll run into visual issues such as stutter).
You'll need to edit the /boot/config.txt file and comment out (put "#" in front of the line) any lines containing dtoverlay=vc4-fkms-v3d, then scroll to the bottom to the [all] section and under it, add dtoverlay=vc4-kms-v3d (as you can see, this is now using "kms" instead of "fkms"). You can also do this by using the following commands:
sudo sed -i 's/dtoverlay=vc4-fkms-v3d/#dtoverlay=vc4-fkms-v3d/g' /boot/config.txt
sudo sed -i 's/\[all\]/\[all\]\ndtoverlay=vc4-kms-v3d/' /boot/config.txtPost-upgrade notes
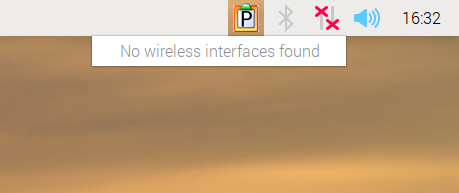
I use the Wifi on my Raspberry Pi 4, and after upgrading to Raspberry Pi OS 11 Bullseye and rebooting, the network panel applet shows my network as disconnected, and upon clicking on it, it shows a message saying "No wireless interfaces found":
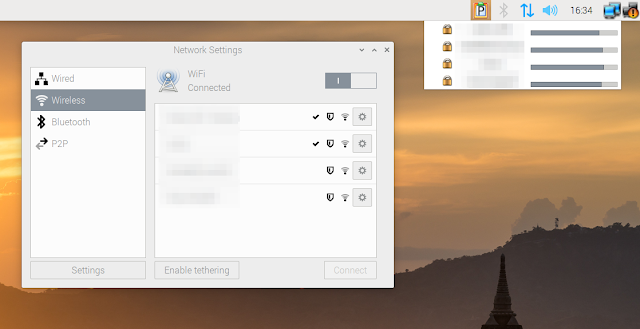
This appears to be related to the fact that with Bullseye, Connman is used to handle network settings. To fix this, I went to the Menu -> Preferences -> Connman Settings -> Wireless, then clicked on the wireless network I want to connect to, then clicked the Connect button. When clicking the gear icon next to a wireless network, there's also an option to autoconnect (disabled by default).
You may remove the panel network applet which no longer works properly, and replace it with the one that works. To remove it, right click it and choose Remove "Wireless & Wired Network From Panel. Then to add the one that works, right click the panel, choose Add / Remove Panel Items - > Add and add the Manage Networks panel plugin:
Another issue I've encountered is that Chromium 92 crashes when visiting youtube.com (does not happen the first time, only on subsequent visits). This is not related to upgrading from Buster to Bullseye because it also occurs on new installs. Right now I'm using a work-around to get it to work (thanks to kerry_s): setting Chromium to automatically delete the YouTube cookies when Chromium is closed. If you want to do this too, open the Chromium settings, search for Cookies, then scroll to Always clear cookies when windows are closed, and add [*.]youtube.com there. Another work-around would be to install the Debian-provided Chromium (package name "chromium", currently version 90), but using that you use the hardware-accelerated video playback that's available in the Raspberry Pi OS version of Chromium (package name "chromium-browser, currently version 92).


