How To Enable Hardware Acceleration In Chromium On Raspberry Pi OS (RPi 4)
This article explains how to enable hardware acceleration in Chromium browser running on Raspberry Pi OS (for Raspberry Pi 4).
By enabling GPU acceleration, the CPU usage should be much lower when playing supported videos (for example on YouTube). In my case, using a Raspberry Pi 4 Model B, the main Chromium gpu and renderer processes went down from ~160% and ~130% to under ~30% and 23% CPU usage (according to htop) after enabling hardware acceleration. As a side note, this is a prerequisite for an article I plan on writing soon.
Raspberry Pi OS comes with everything that's needed to run Chromium with hardware acceleration on a Raspberry Pi 4, but it doesn't work out of the box. For Raspberry Pi 4 there's no need to install extra packages, enable OpenGL, and so on, as those are already enabled. You'll only need to enable some Chromium browser flags; below there's also a "fix" for screen tearing which occurs when playing hardware-accelerated fullscreen videos.
I've tested this using a Raspberry Pi 4 Model B (using Raspberry Pi OS), so I can only confirm this is working for it. According to this, you may need to enable OpenGL with fake/full KMS using raspi-config for older Raspberry Pi models (I'm not sure if extra steps are required on older models). This isn't required for the Raspberry Pi 4.
However, since I can only test this on a Raspberry Pi 4 Model B, and I don't like to write articles about things I can't test myself, I'm only focusing on Raspberry Pi 4 and instructions for it in this article.
Enable hardware acceleration in Chromium browser running on Raspberry Pi OS (Raspberry Pi 4)
To enable hardware acceleration in Chromium browser running on Raspberry Pi OS (Raspberry Pi 4), follow the 3 steps (well, more like 2.5) below:
1. Enable hardware acceleration in Chromium browser.
Enable the following flags in chrome://flags:
- Override software rendering list:
chrome://flags/#ignore-gpu-blocklist - Hardware-accelerated video decode
chrome://flags/#enable-accelerated-video-decode - GPU rasterization:
chrome://flags/#enable-gpu-rasterization
Restart Chromium when you're done.
2. Ensure that the h264ify Chromium extension is enabled.
Chromium on Raspberry Pi OS comes with uBlock Origin and h264ify extensions installed by default. Make sure that h264ify is enabled, so YouTube uses h264-encoded videos for which the Raspberry Pi supports hardware-accelerated video decode.
3. Optional: Fix full-screen video tearing.
To fix full-screen video tearing (fix via), we'll need to disable the compositor. To do this, open a terminal on the Raspberry Pi, and run the following command to run the console version of the Raspberry Pi Software Configuration Tool:
sudo raspi-configUse the Up / Down arrow keys to navigate through its menu, and Tab to select buttons like Finish, OK or Back. To disable the compositor, go to Advanced Options -> Compositor and choose No to disable it.
When you're done, choose Finish and reboot your system.
That's it. Your Chromium web browser should now be hardware accelerated, and be able to perform hardware-accelerated video decode.
How to check if Chromium browser is hardware accelerated
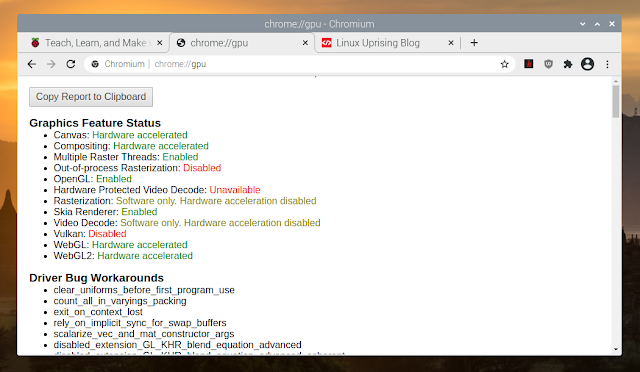
To check if Chromium browser uses hardware acceleration, visit chrome://gpu in Chromium:
If hardware acceleration is enabled, it should show all the hardware acceleration-related fields in green.
This is how it used to look before enabling the flags mentioned above (so in the screenshot below, hardware acceleration is not enabled):
To check out if hardware-accelerated video decoding is working in Chromium, play a YouTube video, then press Ctrl + Shift + i which will open the Chrome DevTools. Next, click the 3 vertical dots menu from the upper right-hand side of Chrome DevTools and choose More tools -> Media:
In the new Media DevTools tab, click the YouTube video on the left (under Players), then make sure the Properties sub-tab is selected, and scroll down to the Video Decoder section. With Chromium 88+ on Raspberry Pi OS, the Decoder name value should be MojoVideoDecoder if hardware accelerated video decode is enabled and working. Up until Chromium 86 (I'm not sure about version 87), the decoder was named MmalVideoDecoder when hardware-accelerated video decoding was enabled and working.
You should also notice your CPU usage being much lower e.g. when playing a 1080p video on YouTube.
You may also want to enable Widevine in Chromium browser running on Raspberry Pi OS, which allows playing Netflix, Amazon Prime, Hulu, and so on.


