How To Get Sound (PulseAudio) To Work On WSL2
This article explains how to get sound (PulseAudio) to work on WSL2 under Microsoft Windows.
By following these instructions, you'll have working sound using PulseAudio on Windows / WSL2 for both console and GUI applications (the article doesn't cover running graphical applications on WSL2 though). Using this, the microphone won't work, or at least it didn't work for me (and I, for one, didn't need it anyway).
Microsoft plans to add built-in support for running graphical applications and sound to WSL2. But until then, you can use these instructions to get the sound working on WSL2.
In case you're still using WSL1, see how to upgrade to WSL2 here. You can check if you're already using WSL2 by running wsl -l -v in Windows PowerShell. Each machine using WSL2 should be listed here, with 2 as their VERSION; if you don't see a version number, or if you see an error message, you have WSL1.
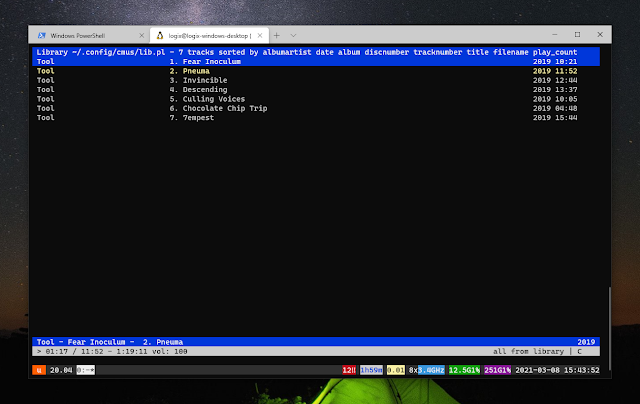
Below is a screenshot that shows Windows Terminal running Ubuntu / WSL2 where I'm using cmus console music player to play music. You can't hear the music to check if it's actually working, so this screenshot is pretty useless, but I needed a screenshot to be used as the article thumbnail 🙂️.
As a totally unrelated note, in case you want to use cmus on WSL2, edit its
~/.config/cmus/rc file (create it if it doesn't exist) and add set output_plugin=pulse to get its sound output to work on your Windows desktop.How to get sound working in WSL2
1. Download PulseAudio for Windows.
On Windows:
The newest release of PulseAudio for Windows 10 that I could find is version 7 from here, built for X2Go. You can either visit that link and click on Snapshot to download PulseAudio for Windows, or click here to download it.
This downloads a .tar.gz archive. Extract this archive and rename the folder that contains pulseaudio.exe, and the other PulseAudio executables and files, to pulse, and copy this new pulse folder to C:\ (so you should have e.g. C:\pulse\pulseaudio.exe).
2. Configure PulseAudio for Windows.
On Windows:
Create a file called config.pa in C:\pulse\. To be able to rename the file extension on Windows, you'll need to enable showing the file extensions from File Explorer.
In this C:\pulse\config.pa file, add the following and save the file when you're done:
load-module module-native-protocol-tcp auth-ip-acl=127.0.0.1;172.16.0.0/12
load-module module-esound-protocol-tcp auth-ip-acl=127.0.0.1;172.16.0.0/12
load-module module-waveout sink_name=output source_name=input record=0
Here, we allow connections from 127.0.0.1 which is the local IP address, and 172.16.0.0/12 which is the default space (172.16.0.0 - 172.31.255.255) for WSL2.
3. Configure PulseAudio in WSL2.
On WSL2 (Ubuntu / whatever you're using):
Let's make sure you have libpulse0 installed, or else this won't work. Its name and command to install it depends on the Linux distribution you're using, so you'll need to search for it and install it. On Ubuntu / Debian, you can install it using:
sudo apt install libpulse0Still on WSL2, you'll also need to edit the ~/.bashrc file with a text editor - using the command below we'll edit it using Nano console editor:
nano ~/.bashrcScroll down in this file to its end, and there paste the following:
export HOST_IP="$(ip route |awk '/^default/{print $3}')"
export PULSE_SERVER="tcp:$HOST_IP"
#export DISPLAY="$HOST_IP:0.0"
Here you can uncomment the export DISPLAY line to also export the DISPLAY environment variable (I've commented it out by default because not everybody will need it). That's needed if you want to use something like VcxSrv to launch graphical applications from WSL2 (using the configuration in this article, graphical applications running in WSL2 will have sound support).
When you're done, save the file and exit Nano (Ctrl + o, Enter then x saves the file and exists Nano). Next, source the ~/.bashrc file to use the new environment variables:
source ~/.bashrc4. Install PulseAudio as a Windows service.
On Windows:
To launch PulseAudio as a Windows service, we'll use NSSM. Download NSSM from here, extract the downloaded archive and copy the win64 nssm.exe executable to C:\pulse\. You can find this in the win64 folder in the downloaded NSSM zip archive.
Next, search for PowerShell in the Windows start menu, right-click the PowerShell entry and choose to Run as Administrator.
In PowerShell, type or paste:
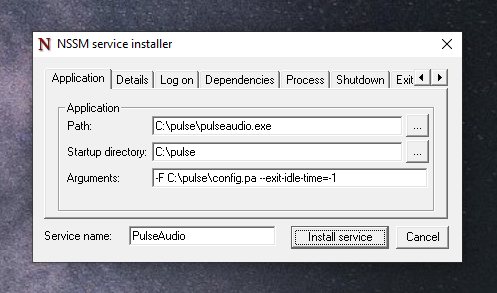
C:\pulse\nssm.exe install PulseAudioThe NSSM GUI will be displayed upon running this command. In its Application tab, use:
- Application path:
C:\pulse\pulseaudio.exe - Startup directory:
C:\pulse - Arguments:
-F C:\pulse\config.pa --exit-idle-time=-1 - Service name (should be automatically filled when the NSSM dialog opens):
PulseAudio
In the Arguments field we're using -F, which tells PulseAudio to run the specified script on startup, while --exit-idle-time=-1 disables the option to terminate the daemon after a number of seconds of inactivity.
On the Details tab, enter PulseAudio in the Display name field:
When you're done with all of this, click the Install service button.
In case you later want to remove this Windows service, run PowerShell as administrator again, and this time run the following command to remove the service:
C:\pulse\nssm.exe remove PulseAudio5. Start the PulseAudio Windows service.
Launch the Windows Task Manager, click on the Services tab and scroll to PulseAudio. When you find the PulseAudio service, right click it and select to Start it:
And we're done. PulseAudio is now working. You should be able to use audio-capable applications inside WSL2, and hear their audio output on your Windows 10 desktop.
Since we've installed PulseAudio as a service on Windows 10, once started, it will automatically start when you login to your Windows desktop, so there's no need to start it manually again.
References: Ubuntu Discourse, this, this and the X2Go Wiki.


