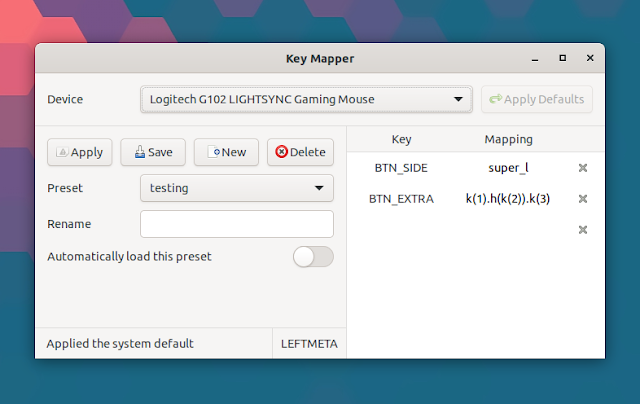
Remap Keyboard And Mouse Buttons On Linux With The New Input Remapper GUI (Supports X11 And Wayland)
Input Remapper (previously Key Mapper) is a new GUI tool to remap your keyboard and mouse buttons on Linux desktops (it supports both X11 and Wayland).
The application supports per-device presets, and it allows using timed macros with the ability to repeat keys, wait between keys, hold a modifier while using a key, and more. Besides keyboards and mice, Input Remapper also comes with basic support for gamepads.
Other features include support for stopping any mappings and using system defaults for a device (using the Apply Defaults button), and support for automatically loading presets on login for plugged in devices. Also, Input Remapper uses evdev to read keycodes and display them inside the application, so the user doesn't have to do this manually.
The application does not support binding commands or scripts to keyboard or mouse buttons. For that, see this article from Linux Uprising.
For future releases, the developer plans to add support for mapping D-Pad and Joystick directions as buttons, automatically loading presets when a device is plugged in after login, and mapping a combined button press to a key.
[[Edit]] Input Remapper has been updated with support for mapping joysticks like D-Pads, support for mapping the mouse wheel, key combinations, and loading presets automatically when devices are connected, even after login.
How to remap keyboard and mouse buttons on Linux using Input Remapper (ex Key Mapper)
Using Input Remapper you can assign the action associated with a keyboard or mouse button (or multiple buttons) to a different button. You may also use it to assign a macro (a sequence of button presses / actions) to a key.
The first time you run Input Remapper, you'll want to select the device (mouse or keyboard) from the device dropdown. Choose a device, and you can start creating a new preset to easily remap your keyboard or mouse buttons.
Left-click in the Key column, then press the keyboard key or mouse button you want to remap, and it will show up in the key box. In case this doesn't work, you may need to click the Apply Defaults button that's displayed to the right-hand side of the device dropdown, and add the key after that.
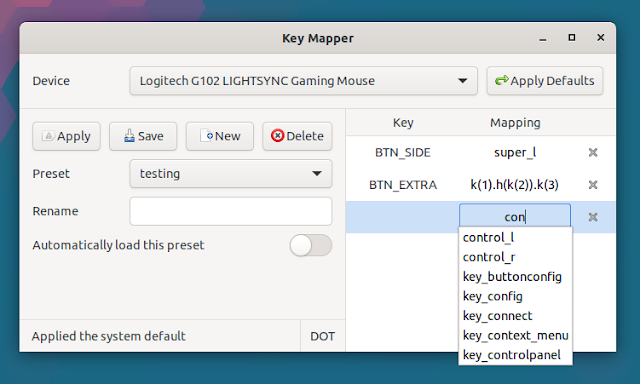
After you enter the key (or keys) you want to remap, it's time to decide its mapping. Click inside the Mapping cell corresponding to the key you want to remap, then start typing what you want to remap the button to. You can type the first few letters instead of the whole word, e.g. you can type "con" and a dropdown should show the available options, like control_l, control_r, etc:
Once you've completed the mappings, click the Save button. And finally, click Apply to start using the new mappings. You must first Save the new mappings, then click the Apply button, or else the changes won't have any effect!
You might like: How To Record And Play Mouse And Keyboard Events Using Atbswp Macro Recorder (GUI)
It's worth noting that using key combinations as mappings isn't as straightforward as you may think, at least not using the latest release (because as I already mentioned, mapping a combined button press to a key is on the todo list). For example if you want to use Ctrl + F1 as the mapping for a key, adding control_l+f1 to the Input Remapper Mapping column won't work. Instead, you'll need to use this macro as the mapping: m(control_l, k(f1)).
For how to use macros, check out the Input Remapper macro documentation, which also includes a few examples.
Download Input Remapper (previouslt Key Mapper)
Input Remapper can be installed easily on Debian / Ubuntu and Linux distributions based on these (like Linux Mint, Pop!_OS, Zorin OS, Elementary OS, etc.) by using the DEB package that can be downloaded from the application releases page.
Arch Linux and Manjaro users can install Input Remapper by using an AUR package.
You may also install Input Remapper using PIP as explained here, which works on any Linux distribution (I don't recommend using PIP with sudo though; also, on some Linux distributions you'll need to use pip3 instead of pip, since this needs Python 3).
You might like:


