Change CPU Governor And Frequencies On Linux With cpupower-gui (New Release)
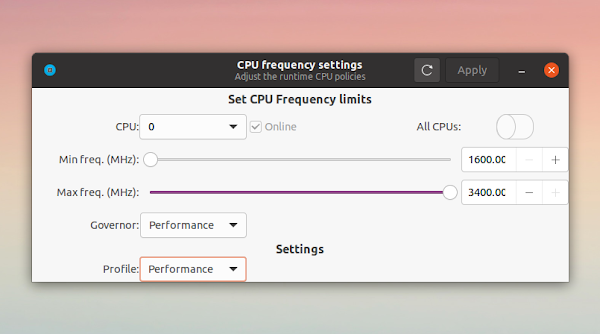
cpupower-gui is a tool that makes it easy to change the CPU governor as well as the CPU frequency limits on Linux.
Besides changing the CPU governor and CPU frequency limits, the application supports:
- enabling or disabling a specific CPU core
- switching CPU governors or profiles through the command line
- AppIndicator for quickly switching the CPU profile (currently the GUI must be running for the AppIndicator tray icon to be available)
This Python3 + Gtk3 application was updated to version 0.9.0 (followed by 0.9.1 to fix a few bugs) recently with new features, like the ability to use custom CPU profiles for quickly switching the settings. You can switch between the 2 pre-built profiles, Balanced and Performance, from the cpupower-gui user interface, but you can't change them or create a new profile from there.
Instead, to create a new profile you must create a text file with a
.profile suffix (e.g. custom.profile) in /etc/cpupower_gui.d/ if you want it to be available to all users, or in ~/.config/cpupower_gui/ for your user only. For what that file should contain, see this example profile file, and read the information from here.Yet another feature in the latest cpupower-gui release is the ability to apply the CPU configuration at boot or after the user logs in. This feature was implemented as two systemd units, a system (cpupower-gui.service) and a user (cpupower-gui-user.service) one, and is not accessible from the GUI. To control this you need to edit the already existing /etc/cpupower_gui.conf configuration file, or adding a .conf file in /etc/cpupower_gui.d/ or ~/.config/cpupower_gui/ to override the default behavior.
By default, the cpupower-gui configuration is set to use the Balanced profile on boot. For example if you want to apply the Performance profile at boot, you'll need to edit the /etc/cpupower_gui.conf file with a text editor as root - in this example I'll use Nano command line text editor to open the file:
sudo nano /etc/cpupower_gui.confIn this file change profile=Balanced to profile=Performance and save the file. To save the file using Nano text editor, press Ctrl + x, then type y and press Enter.
You'll find only one other option in this configuration file: allcpus_default, which is set to False by default. This option controls the default state of the To All CPUs toggle from the application GUI.
You might also like: auto-cpufreq Is A New CPU Speed And Power Optimizer For Linux
More enhancements in cpupower-gui 0.9.0/0.9.1:
- Support for Intel's P-state driver and energy performance preferences (allows you to choose the energy profile when using the intel_pstate driver)
- Marks on the sliders to indicate frequency steps (when available)
- Store parameter changes per CPU so changes can be applied at once
- Indicate with red the CPUs with changed parameters
- Indicate with red the CPUs with changed parameters
For the future, I'm hoping the developer will make all these new features available directly from the GUI. The user interface needs a bit of polish as well, I'd say. Other than that, this is a much-needed application, especially since it should work on any desktop environment, unlike some other solutions (like GNOME Shell extensions for example).
Download cpupower-gui
The application can be installed from the official repositories on many Linux distributions, including Debian Testing and Unstable, Ubuntu 20.04 and 20.10, Kali Linux, OpenMandriva Rllling and Cooker, Rasbian Testing, and more.
It has yet to be updated to the latest version in most cases though. If you want to use the new features, like the ability to apply a CPU profile on boot, and use the new profiles feature, make sure to install the latest 0.9.1 version. If this isn't available in your Linux distribution repositories, see the third-party repositories listed on the cpupower-gui page, available for Arch Linux / Manjaro (AUR), Debian / Ubuntu and derivatives, Fedora, and more. If you're on Ubuntu 20.10, you can grab the Ubuntu 20.04 binary - that's what I'm using now and it works with no issues.


