Top Things To Do After Installing Ubuntu 20.04 Focal Fossa To Make The Most Of It
Ubuntu 20.04 LTS (Focal Fossa) has been released, so I've prepared a list of top things to do after installing it.
Whether you're new to Ubuntu or a long-time user, use this list of top things to do after installing Ubuntu 20.04 LTS, to help you get most things set up so you can enjoy your new Ubuntu 20.04 LTS desktop, and customize it to accommodate your needs.
I obviously don't know what each user does after a fresh Ubuntu installation, so this list contains the things I do that I think would benefit others. Use the tweaks that you find useful for your use case.
Enhance your GNOME desktop in Ubuntu 20.04 Focal Fossa
1. GNOME Tweaks
GNOME Tweaks is a must-have for any GNOME Shell user. I gives access to extra settings like changing the GTK, icon and Shell theme, enable or disable GNOME Shell extensions, change the fonts, disable mouse acceleration (set it to Flat in Tweaks), disable touchpad while typing, add startup applications, tweak the top bar, window titlebars, windows and workspaces.
Install Tweaks by clicking on this button or using the command below it:
sudo apt install gnome-tweaksTo change the GNOME Shell theme you'll need to install the
User themes extension. This is available in the gnome-shell-extensions package, which includes the default GNOME Shell extensions, and you can install it by clicking this button or using the command below it:sudo apt install gnome-shell-extensionsAfter installing it, restart Gnome Shell (in the default X11 session, restart GNOME Shell by pressing
Alt + F2, typing r and pressing the Enter key; in case you've switched to Wayland you'll need to logout and relogin), and enable the User themes extension using the Gnome Tweaks application.I know a lot of users would like to use a dark GNOME Shell theme, even when using the default (mixed) Yaru theme. So in case you're one of them, now you can change the GNOME Shell theme to Yaru Dark by opening the Tweaks application (if it remained running after enabling the
User themes extension, close and reopen Tweaks), clicking on Appearance in the left-hand sidebar, and changing the Shell theme from Default to Yaru-dark.2. Customize Ubuntu Dock
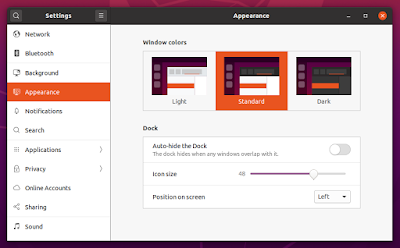
The dock shown on the left-hand side of the desktop by default, used to display running applications and pin applications icons, can be configured from
Settings -> Appearance. From there you can choose to set it to autohide, change its icon size, and its position on the screen (left, right or bottom).There are a lot more customization options for Ubuntu Dock available via Dconf Editor, which you can install by clicking on this button or using the command below it:
sudo apt install dconf-editorWith Dconf Editor, go to
org -> gnome -> shell -> extensions -> dash-to-dock, and you'll be able to enable minimize on click for the dock icons (set click-action to minimize), change its background opacity, set the hide delay, change the intellihide mode from the default "all windows" to focused windows or maximized windows only, change the running indicator (dot) style and color, hide mounted volumes (like USB drives) from the dock, show a trash can on the dock, and more.If you want to replace Ubuntu Dock with something else, like Plank, see here a list of ways of getting rid of Ubuntu Dock.
3. Spice up your Ubuntu 20.04 desktop with some GNOME Shell extensions
GNOME Shell ca be extended with the help of extensions. There are thousands of extensions available to install, and you can find them on https://extensions.gnome.org/
To be able to install GNOME Shell extensions through the GNOME Shell Extensions website, you'll need to install a package from the repositories - install it by clicking this button or using the command below it:
sudo apt install chrome-gnome-shellNext you'll need to install a web browser extension: for Firefox or Google Chrome / Chromium.
Now to install a GNOME Shell extension, go to https://extensions.gnome.org/ in the web browser where you've installed the extension mentioned above, search for the extension you want to install, and on its page click the
OFF toggle in the page upper right-hand side corner to turn it ON. A popup will ask you if you wish to install the extension - click Install and the extension will be installed on your system.You can update installed extensions, remove or disable extensions, and access their settings by visiting https://extensions.gnome.org/local/. You may also enable / disable extensions and access their settings by using the Tweaks application.
4. Automatically change the Shell / GTK theme to dark variant when GNOME Night Light is on
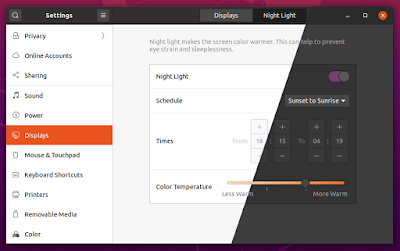
The GNOME Night Light feature is used to make your display switch to a warmer color in the evening, helping you sleep better and prevent eye strain.
This feature can be enabled from
Settings -> Display -> Night Light. From there you can choose to have it run automatically based on sunset / sunrise times or enable it on a manual schedule, and you can also control the color temperature.If you'd like to extend the Night Light functionality to automatically switch to the dark variant of the GTK, GNOME Shell and icon theme when Night Light kicks in, there is a GNOME Shell extension that do just that. When Night Light is turned off, either by you or the schedule you set in
Settings, the theme is switched back to the regular GTK / Shell theme variant.To have this feature, after you enable installing themes from extensions.gnome.org as explained in step 3 above, install the following GNOME Shell extension:
All you need is this extension installed, and have GNOME Night Light enabled, and the theme will be switched automatically based on the Night Light schedule.
In case you want to use a different GTK3 theme for some applications (like have Night Light change the GTK3 theme to dark, but force a few application to use light themes), see this article.
5. Android users: Integrate your phone with the Ubuntu 20.04 GNOME Shell desktop using GSConnect
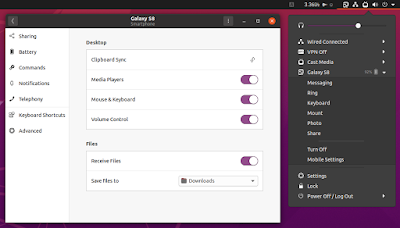
In case you use Android, you can integrate your phone with your Ubuntu (GNOME) desktop by using GSConnect.
GSConnect is a complete implementation of KDE Connect especially for GNOME Shell. You can get notifications from your Android phone on your desktop (and vice versa), reply to messages received on Android from your desktop, easily share files, and remote control some aspects of your desktop from your Android phone.
You'll also need to install KDE Connect on your Android phone, either from Google Play or F-Droid.
As a side note, I linked to the GSConnect GNOME Shell Extensions website so you install the extension from there, and not the Ubuntu repositories. That's because while GSConnect can be found in the Ubuntu 20.04 repositories, it's an ancient version.
6. Quick application launcher with extra features
While the GNOME Shell built-in application launcher is fast in Ubuntu 20.04 LTS, I personally still prefer to use a quick launcher. Not only because it's fast, but because it can do a lot of things thanks to plugins.
There are quite a few quick launchers available for Ubuntu, but in this article I'll only list one, which I find to cover most needs.
Ulauncher is a Python 3 / GTK+ 3 application launcher that features fuzzy search, custom color themes, filesystem integration (so you can browse files on your system using it), and support for plugins.
There are over 70 extensions available for Ulauncher, for various purposes like search and start VirtualBox machine, translate with Google Translate, convert between various measuring units, integration for clipboard managers like GPaste or CopyQ, it integrates with password managers such as pass or Bitwarden, kill processes, search and insert Emoji, and much more.
Once it's installed and running, activate Ulauncher using
Ctrl + Space by default, then you can start typing what you're looking for.You'll need to install the Ulauncher extensions separately, by visiting its extensions website and then pasting the extension URL in the Ulauncher preferences (after clicking Add extension).
7. Fix Qt5 applications style under GNOME Shell on Ubuntu 20.04
Qt5 applications look out of place (ugly - there, I've said it) on Ubuntu 20.04, not respecting the GTK+ theme.
There is a way to get them to look as close as possible to the default Ubuntu 20.04 Yaru theme though. No, not by using the old
export QT_QPA_PLATFORMTHEME=gtk2 tweak, that causes Qt5 applications to start very slowly on a fresh Ubuntu installation, starting with Ubuntu 19.10 (it still happens on Ubuntu 20.04), but by using Kvantum.Kvantum is an SVG-based theme engine for Qt. We can use it on GNOME to style Qt5 applications to look more native, thanks to the Kvantum built-in theme KvYaru, which looks very similar to the default Ubuntu 20.04 theme Yaru.
This only works with native applications (DEB / built from source); snap and flatpak applications will continue to look the same as before.
This is how VLC and Qbittorrent, two Qt5 applications, look by default on Ubuntu 20.04:
This is how they look after using Kvantum with the KvYaru theme:
Install the Kvantum Qt5 style and the Kvantum themes packages by clicking this button or using the command below it:
sudo apt install qt5-style-kvantum qt5-style-kvantum-themesNext, open the
~/.profile file with Gedit:gedit ~/.profileAt the bottom of this file, add a new line with:
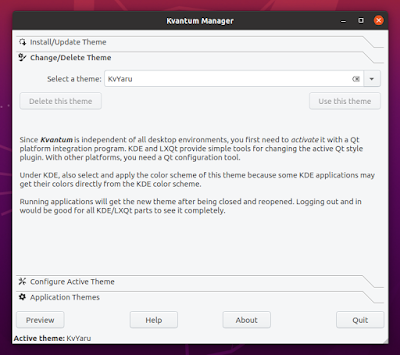
export QT_STYLE_OVERRIDE=kvantumSave the file, and open Kvantum from the applications menu. Click on
Change/Delete Theme, and choose KvYaru as the theme to use for Qt5 applications:Now you need to logout and relogin. Open some Qt5 application and it should... no longer be ugly.
You may also like: How To Add A Show Desktop Icon To Ubuntu Dock / Dash To Dock
Enable flatpak and add the Flathub repository
Flatpak is a tool for building and distributing desktop applications on Linux in a sandbox environment (isolated from the rest of the system). Flatpak packages are built to be distribution and desktop agnostic, and come with all the dependencies needed, which makes them larger than native packages (but after installing a runtime - which provides the basic dependencies used by some applications -, the size decreases considerably), but this also means it can run on systems where the application dependencies are not available.
Flathub is the official Flatpak repository, containing hundreds of applications that are updated constantly.
For Ubuntu 20.04, Canonical has made it harder to use Flatpak packages in favor of Snap, by installing the Snap Store by default instead of the standard GNOME Software application (Snap Store is a fork of GNOME Software, but which doesn't support Flatpak). Inspite of this, it's still possible to install Flatpak applications on Ubuntu 20.04, and update them using GNOME Software.
To install Flatpak and the GNOME Software Flatpak plugin (this will also install GNOME Software, and thanks to this plugin you'll be able to update Flatpak applications using GNOME Software), use this button or the command below it:
sudo apt install flatpak gnome-software-plugin-flatpakThen add the Flathub repository:
flatpak remote-add --if-not-exists flathub https://flathub.org/repo/flathub.flatpakrepoA system restart is required for Flatpak to function properly.
After this you'll be able to use "Software" (in the applications menu you'll see the preinstalled "Ubuntu Software" which is the Snap Store, and "Software", which is the GNOME Software application) to search, install and update Flatpak applications.
It's worth noting that using "Software" (not "Ubuntu Software"), you can also install native (DEB) packages, as well as Snap packages, and not just Flatpak applications. Also, when searching for a package, you'll usually find the Flatpak at the bottom of the list.
Gaming (Steam, Lutris and GameMode)
For gaming, most users will probably want to install Steam and Lutris.
Steam can be installed from the Ubuntu 20.04 repositories, by clicking this button or the command below it:
sudo apt install steam-installerLutris is an open source gaming platform that can be used to play Steam, GOG, Battle.net, Origin, Uplay games, and more. It makes it easy to add Wine versions, enable DXVK and more, to be able to play Microsoft Windows games on Linux.
Lutris is not in the Ubuntu repositories but you can install it from its official PPA:
sudo add-apt-repository ppa:lutris-team/lutris

sudo apt install lutris
Lutris also has some requirements:
- If you have Nvidia graphics, you'll need to install the proprietatry drivers using the Additional Drivers tool that can be found in the Ubuntu applications menu
- To use DXVK, you'll need to install the Vulkan libraries:
- for AMD graphics:
sudo apt install mesa-vulkan-drivers mesa-vulkan-drivers:i386- for Nvidia graphics:
sudo apt install libvulkan1 libvulkan1:i386Installing Lutris will also install Wine (stable, from the Ubuntu repositories), so we've got that covered in one go. Lutris comes with its own bundled Wine builds too, but in case you want to install Wine Staging or Development builds on Ubuntu 20.04, check out this link.
If you need a guide on using Lutris, check out this article.
In Ubuntu 20.04, Feral Interactive's GameMode is installed by default. This is a daemon / library for Linux that allows games to request a set of optimizations to be temporarily applied to the host operating system and / or a game process.
It optimizes the CPU governor, I/O priority, process niceness, kernel scheduler, inhibits the screensaver, changes the GPU performance mode, and more.
Using GameMode with Lutris doesn't require any configuration on your part. Lutris enables GameMode for all games by default, as long as GameMode is available on the system.
With Steam, you'll need to edit the game(s) launch options to use:
gamemoderun %command%Other tweaks
1. Install extra codecs, support for archive formats, etc.
Install extra codecs, Java (OpenJRE 11), Microsoft Web fonts, support for extra archive formats (rar, 7zip), enable playing encrypted DVDs, etc., by clicking this button or the command below it:
sudo apt install openjdk-11-jre unrar rar p7zip-full ubuntu-restricted-extras libdvd-pkgWhen doing this from a terminal, when asked to accept the Microsoft Web fonts license press
TAB to select Yes, then press Enter.To enable encrypted DVD playback, you'll also need to run this command:
sudo dpkg-reconfigure libdvd-pkgAnd choose
Yes when asked if the package should download, build, and install libdvdcss2.2. Enable backups
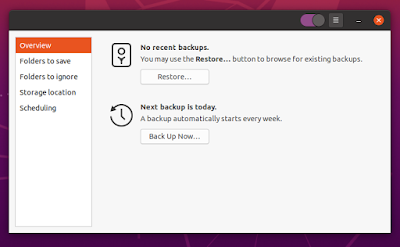
Backups should be in any list of top things to do after installing Ubuntu 20.04. You may not like something you tweak after a fresh Ubuntu installation, and backups make it easy to revert the changes in case you don't remember what or how you've done something.
Ubuntu comes with Deja Dup (called Backups in the applications menu) for creating and restoring backups. But it doesn't create backups until you enable it.
You can store backups to a local folder, network location, or in your Google Drive. To enable backup saving to Google Drive you'll need to enter your Google username and password in
Online Accounts (you'll find it in Settings), then choose Google Drive as the storage location in the Backups app.In case Deja Dup backup tool doesn't suit your needs, you can install and setup BorgBackup, a command line deduplicating and compressing backup program that's feature-packed. Install it using the button below or the command that follows:
sudo apt install borgbackupIf you want to use a GUI for BorgBackup, I recommend you check out Vorta.
You also have the option of installing TimeShift, a popular backup (which is shipped by default with Linux Mint) and system restore utility which takes snapshots of the system at regular intervals. These snapshots can be restored at a later date to undo system changes. The snapshots are incremental, and can be created using rsync or BTRFS snapshots using BTRFS tools (only for BTRFS filesystems).
Install TimeShift using this button or the command below it:
sudo apt install timeshift3. Laptop users: Extend your laptop's battery life with TLP (and an optional GUI for TLP)
TLP is an advanced power management tool for Linux. The command line tool comes with a default configuration optimized for battery saving, so it's very easy to use - just install TLP and you can forget about it.
TLP is highly customizable though, so in case you want to change some of its settings you can do that too (this is done by editing the TLP configuration file).
TLP auto-detects if your laptop runs on battery or AC and applies settings (changes the CPU frequency scaling and governor, sets the WiFi power saving mode, enables or disables integrated radio devices, sets the disk APM and disk spin down timeout, etc.) that optimize the laptop for performance (when on AC) or battery saving (when on battery).
Install TLP using this button or the command below it:
sudo apt install tlp tlp-rdwFor ThinkPads you'll also need to install a couple of extra packages, which once again can be installed by clicking this button or the command that follows it:
sudo apt install tp-smapi-dkms acpi-call-dkmsTLP starts automatically on boot. To avoid a system reboot you can start it right after installing it using:
sudo tlp startThere's also a GUI for TLP that you can use to configure it, called TLPUI. You can download the TLPUI DEB package from the Linux Uprising Apps PPA:
4. Disable unattended upgrades
The
unattended-upgrades package is installed by default on Ubuntu 20.04. When enabled, unattended-upgrades automatically installs the latest security (and other) updates.While it's a nice feature to have, some users might not like this Microsoft Windows-like behavior of installing updates with no input from the user. Especially when you want to shutdown or reboot your system while in a hurry and you can't, because there's an upgrade in progress. And if you force shutdown / reboot your system while you may break your system, or at least get the infamous "
E: Could not get lock /var/lib/dpkg/lock" or "E: dpkg was interrupted" errors.To avoid all of this, you can disable
unattended-upgrades so your system doesn't automatically install updates.It's worth noting that it's better to disable unattended upgrades instead of removing the package, because the package might be pulled as a dependency and be installed again later on.
To disable unattended-upgrades run:
sudo dpkg-reconfigure unattended-upgradesWhen asked if Ubuntu should
Automatically download and install stable updates, press TAB to choose No, then press Enter, and you're done.5. Bash history: show a timestamp (date / time) when each command was executed
Bash keeps a history of the commands you type, which can be accessed by typing
history in a terminal. By default, you'll notice there's no timestamp for the commands you've previously ran, and I find having a timestamp very useful in some occasions, like to remember which commands you ran in a specific time-frame, to undo various operations, and so on.If you want to enable timestamps for your Bash history, open
~/.bashrc with Gedit:gedit ~/.bashrcAnd at the bottom of the file add (yes, there's a space after %T and before the closing quotes):
HISTTIMEFORMAT="%F %T "Then save the file, and source
~/.bashrc using:source ~/.bashrcBash will now keep a timestamp of each command you run from this point going forward. Previously ran commands will have the timestamp of the time when you enabled this (so all previously run commands will have an identical timestamp).
To try it, run a few commands, then run
history in a terminal.To customize the timestamp format, see this article from LinuxUprising.
6. Spice up your Bash prompt with Starship
Starship is a minimal, very fast (written in Rust) shell prompt for Bash, Fish and Zsh (but here I'll assume you're using the Ubuntu 20.04 default, which is Bash) that shows extra information only when it's needed. Check out its homepage to see it in action.
Also see my previous article: Starship Is A Minimal And Fast Shell Prompt Written In Rust.
To install it, download the binary from GitHub (
starship-x86_64-unknown-linux-gnu.tar.gz), extract the archive, then in the folder where you've extracted the starship binary run this command (to install it to /usr/local/bin):sudo install starship /usr/local/binYou'll also need to install a powerline font, like Fira Code, which is available in the Ubuntu repositories and can be installed using:
sudo apt install fonts-firacodeNow enable Starship by opening your
~/.bashrc with Gedit:gedit ~/.bashrcAnd add the following line at the end of the file:
eval "$(starship init bash)"And finally, source
~/.bashrc so the changes are applied to your current terminal:source ~/.bashrcIf you want to configure Starship, see this page.
Extra applications
Ubuntu comes with preinstalled applications for basic things. You'll find Firefox web browser, a text editor (Gedit), a music player (Rhythmbox), video player (Totem), and so on. But not everybody uses these, or not only these.
Below I'll list some of the most popular applications, and links to install them from snap, flatpak and DEB packages (with the latter either available directly in the repositories or on the application's website). It's worth noting that for some applications, only the snap version is listed by Ubuntu Software, even when there are native packages (DEB) available in the repositories, e.g. that was the case with GIMP in my case.
Snap and flatpak packages are sandboxed, and offer more security, but they are also larger and may have some occasional glitches due to their sandboxed nature. Install the package that you prefer.
For snap (snap links) and DEB packages (apt links) that are already in the Ubuntu repositories, the links below should open Ubuntu Software app with the application you clicked on opened in it, ready to be installed. Click the install button from there to install it. Apt links may also open in a small dialog popup, depending on what you choose when you first opened such a link.
For Flatpak applications, the Flathub application page is opened. You need to enable flatpak and Flathub to be able to install such applications (see "Enable flatpak and add the Flathub repository" above for instructions).
1. Choose your web browser
Ubuntu 20.04 LTS (Focal Fossa) comes with Firefox web browser install by default, but many other web browsers are available for Linux. If you prefer a Chromium-based web browser, quite a few are available, including:
- Download Google Chrome (DEB)
- Download Vivaldi (DEB)
- Install Opera (snap) | Download Opera (DEB)
- Download Brave (repository/DEB)
- Install Chromium browser (snap)
If you'd like to use Chromium Browser with hardware acceleration enabled (VAAPI), there's a PPA you can use. As a bonus, the package is a native DEB, and not a snap (Ubuntu 20.04 has Chromium browser available as a snap package only, even when installed using apt).
2. Cloud Storage
Almost everybody uses some cloud storage service nowadays, and you'll probably want to have your files available soon after installing Ubuntu 20.04 (Focal Fossa). Below you'll find a one-click install button for cloud storage clients available in the Ubuntu repositories, like Dropbox or Nextcloud, options to download the clients for some services, and alternatives where's there's no official solution.
- Google Drive:
Settings, go to Online Accounts and add your Google account there. Once you do this, your Google Drive files will be available from the Files (Nautilus) application.By adding your Google account to Online Accounts, there's also the added bonus of having Google integrated with other GNOME applications, for example GNOME Calendar will be in sync with your Google Calendar, you can make backups to your Google Drive using Backups (Deja Dup), etc.
You can even use this in desktop environments other than GNOME, like Xfce or MATE desktops.
- OneDrive:
If you prefer having your Microsoft OneDrive mounted on Linux, you can make use of Rclone to mount it.
Mounting OneDrive on Linux means that you have instant access to your files, without having to download them until they are accessed or copied to the local disc. But that also means they are not available in case your Internet goes down. So if you prefer, you could use a fork of OneDrive Free Client, a command line tool that keeps your OneDrive files in sync with a folder on your Linux machine.
- InSync:
More (click the link installs the package from the Ubuntu repositories, minus Mega which needs to be downloaded separately):
3. Communication
Do you use Slack, Discord, Skype, Telegram, Teams or Pidgin? Click the links below to install / download them (you'll find flatpak, snap, apt packages and official downloads, where available):
- Slack: install flatpak | install snap | install DEB | download DEB
- Discord: install flatpak | install snap | download DEB
- Telegram: install flatpak | install snap | install DEB | download generic Linux binary
- Skype: install flatpak | install snap | download DEB
- Microsoft Teams (Preview): install flatpak | download DEB
- Pidgin: install (DEB)
4. Video player:
- VLC: install flatpak | install snap | install DEB
- SMPlayer: install (DEB)
- mpv: install (DEB; the snap version is quite old)
5. Audio player:
- Audacious: install (DEB)
- Clementine: install (DEB)
- Spotify: install flatpak | install snap | install repository/DEB
6. Graphics editors:
- GIMP (GNU Image Manipulation Program): install flatpak | install snap | install DEB
- Inkscape: install flatpak | install snap | install DEB
- Krita: install flatpak | install snap | install DEB
- MyPaint: install flatpak | install DEB
7. Code editors:
- Visual Studio Code: install flatpak | install snap | download DEB
- VSCodium: install flatpak | install snap | add repository (DEB) | download DEB or AppImage
- Sublime Text: install flatpak | install snap | install repository/deb or generic Linux binary
- Atom: install flatpak | install snap | download DEB
What about you? What are some top things to do after installing Ubuntu 20.04 LTS Focal Fossa that you'd recommend.


