2 Utilities To Install The Latest Kernel In Ubuntu Or Linux Mint (GUI and Command Line)
After a regular Ubuntu version is released, it usually doesn't receive new major kernel version updates. For LTS releases, like Ubuntu 18.04, there are LTS Enablement Stacks which provide newer kernel and Xorg upgrades, but it takes a while until they are released.
For example, Ubuntu 18.04 should receive an updated kernel around February 2019.
If you want to install a kernel newer than the one available in Ubuntu for reasons like some new important feature, better hardware support, or in case they fix some critical issue you're having with the default Ubuntu kernel, like some device not working, you can use the Mainline Kernel PPA.
This is not an actual PPA that you can add on your system like a Launchpad PPA and instead, you need to manually download and install the DEB packages. To make this process easier and optionally be notified when new kernels are available in the Mainline PPA, there are various tools you can use, and this article presents two such tools, one that uses a graphical user interface, and another one that can be used from the command line. Both utilities support not only Ubuntu, but also Ubuntu-based Linux distributions like Linux Mint.
In this article:
- WARNING - Please read before updating the kernel
- Update the kernel in Ubuntu or Linux Mint using a GUI utility called Mainline
- Update the kernel in Ubuntu or Linux from the command line using ubuntu-mainline-kernel.sh
- How to recover from a broken kernel installation (in case your computer boots to a black screen, freezes or something is not working after upgrading the kernel)
WARNING - Please read before updating the kernel
Before installing anything you should know that usually it's not a good idea to install a mainline kernel on your Ubuntu machine. These kernels are built from the latest Linux sources, without any Ubuntu patches or any other modifications, and are unsupported.
What's more, installing a kernel from the Mainline Kernel PPA usually breaks proprietary drivers or out-of-tree modules, like the proprietary Nvidia graphics drivers, Broadcom wireless drivers, VirtualBox dkms module, and so on. As a result, your computer may boot to a black screen, you may experience random freezes, and / or your WiFi may not be working after installing and booting to a mainline kernel.
As an example, I installed the latest Linux 4.19 while having the Nvidia 396.54 graphics drivers installed, and the Nvidia module failed to build. Luckily, the Nvidia Graphics PPA has a newer drivers version that supports Linux 4.19 - Nvidia 410, so I installed that to solve the issue. But if Nvidia 410 hadn't been released or if my graphics card wouldn't have supported the latest version of the drivers from the PPA, my computer would have booted to a black screen using the 4.19 kernel (or I'd have to remove the proprietary Nvidia drivers and use Nouveau instead).
This said, use these tools to install the latest kernel from the Ubuntu Kernel PPA at your own risk!
Update the kernel in Ubuntu or Linux Mint using a GUI utility called Mainline
[[Edit] Ukuu, or Ubuntu Kernel Update Utility, is no longer free to use, so I have replaced it in this article with Mainline, a continuation of Ukuu that's free.
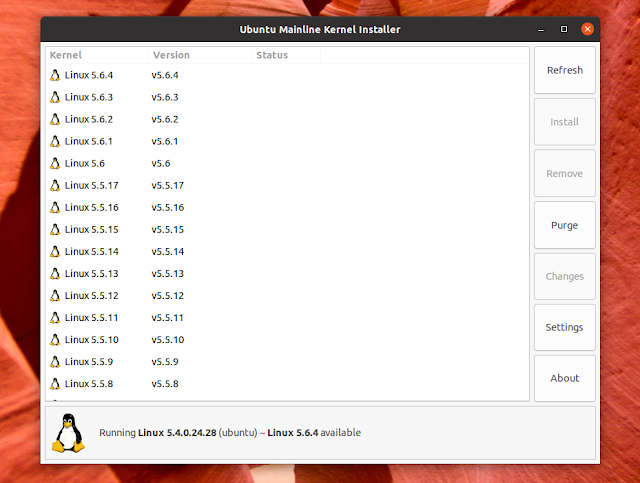
Mainline (or "Ubuntu Mainline Kernel Installer" is a tool for installing the latest mainline kernel on Ubuntu-based distributions.
The application displays the list of kernels available in the Ubuntu Mainline Kernel PPA, allowing users to easily download and install the desired version. Using it, you can also remove a mainline kernel installed using this utility, as well as see the changes in a kernel version.
It can also display notifications when new kernels are available, and it can change the GRUB menu timeout from its settings, useful in case you want to use an older kernel in case there's an issue with a newly installed kernel.
Mainline can be downloaded from its project page, or it can be installed by using a PPA:
sudo apt-add-repository -y ppa:cappelikan/ppa
sudo apt update
sudo apt install mainline
Now you can launch Mainline, select the Linux version you want to install and click the
Install button. A new window will pop up, displaying what's going on under the hood, like downloading the kernel debs and installing them:Update the kernel in Ubuntu or Linux Mint from the command line using ubuntu-mainline-kernel.sh
ubuntu-mainline-kernel.sh is a Bash script to easily install kernels from the Ubuntu kernel PPA.
The command line tool also allows removing installed kernels from the Ubuntu kernel PPA, it can check if a newer kernel version is available, list locally installed kernel versions, and search and list available kernel versions. It can also only download the deb files, without installing them.
What's more, compared to Ukuu, this console tool also allows installing the low-latency (this reduces latency and is useful e.g. for audio recording, but it sacrifices power saving) version of the kernel, available for amd64 and i386 only, as well as install the Large Physical Address Extension kernel, which is only available for armhf.
As a general rule, I recommend checking out the code used in this script and any other scripts you run on your system, and only run them if you have at least some basic understanding of what they do.
You can install ubuntu-mainline-kernel.sh script to
/usr/local/bin/ using these commands:wget https://raw.githubusercontent.com/pimlie/ubuntu-mainline-kernel.sh/master/ubuntu-mainline-kernel.sh
sudo install ubuntu-mainline-kernel.sh /usr/local/bin/The ubuntu-mainline-kernel.sh project also includes a desktop file that you can add to startup, to automatically check if there is a new kernel version when you login. This is optional and if you want this feature, you can install it using these commands (
libnotify-bin is required to show desktop notifications when a new version is available):sudo apt install libnotify-bin
wget https://raw.githubusercontent.com/pimlie/ubuntu-mainline-kernel.sh/master/UbuntuMainlineKernel.desktop
mv UbuntuMainlineKernel.desktop ~/.config/autostart/Now you can start using ubuntu-mainline-kernel.sh. Check the latest available kernel version from the Ubuntu kernel PPA using
-c:ubuntu-mainline-kernel.sh -cTo install a kernel version, use
-i version, e.g. -i 4.9, like this:sudo ubuntu-mainline-kernel.sh -i 4.9Or use simply
-i to install the latest available version. Here's how it looks like:$ sudo ubuntu-mainline-kernel.sh -i
Finding latest version available on kernel.ubuntu.com
Latest version is: v4.19.0, continue? (y/N)
Will download 6 files from kernel.ubuntu.com:
Downloading CHECKSUMS: 100%
Downloading CHECKSUMS.gpg: 100%
Downloading linux-headers-4.19.0-041900-generic_4.19.0-041900.201810221809_amd64.deb: 100%
Downloading linux-headers-4.19.0-041900_4.19.0-041900.201810221809_all.deb: 100%
Downloading linux-image-unsigned-4.19.0-041900-generic_4.19.0-041900.201810221809_amd64.deb: 100%
Downloading linux-modules-4.19.0-041900-generic_4.19.0-041900.201810221809_amd64.deb: 100%
Signature of checksum file has been succesfully verified
Checksums of deb files have been succesfully verified with sha256sum
Installing 4 packages
/etc/kernel/postinst.d/initramfs-tools:
update-initramfs: Generating /boot/initrd.img-4.19.0-041900-generic
/etc/kernel/postinst.d/zz-update-grub:
Generating grub configuration file ...
Found linux image: /boot/vmlinuz-4.19.0-041900-generic
Found initrd image: /boot/initrd.img-4.19.0-041900-generic
Found linux image: /boot/vmlinuz-4.18.0-10-generic
Found initrd image: /boot/initrd.img-4.18.0-10-generic
Found memtest86+ image: /boot/memtest86+.elf
Found memtest86+ image: /boot/memtest86+.bin
done
Cleaning up work folderAll available options:
ubuntu-mainline-kernel.sh -h
Usage: /usr/local/bin/ubuntu-mainline-kernel.sh -c|-l|-r|-u

Download & install the latest kernel available from kernel.ubuntu.com

Arguments:
  -c               Check if a newer kernel version is available
  -i [VERSION]     Install kernel VERSION, see -l for list. You dont have to prefix
                   with v. E.g. -i 4.9 is the same as -i v4.9. If version is
                   omitted the latest available version will be installed
  -l [SEARCH]      List locally installedkernel versions. If an argument to this
                   option is supplied it will search for that
  -r [SEARCH]      List available kernel versions. If an argument to this option
                   is supplied it will search for that
  -u [VERSION]     Uninstall the specified kernel version. If version is omitted,
                   a list of max 10 installed kernel versions is displayed
  -h               Show this message

Optional:
  -s, --signed         Only install signed kernel packages (not implemented)
  -p, --path DIR       The working directory, .deb files will be downloaded into
                       this folder. If omitted, the folder /tmp/ubuntu-mainline-kernel.sh/
                       is used. Path is relative from $PWD
  -ll, --low-latency   Use the low-latency version of the kernel, only for amd64 & i386
  -lpae, --lpae        Use the Large Physical Address Extension kernel, only for armhf
  -do, --download-only Only download the deb files, do not install them
  -ns, --no-signature  Do not check the gpg signature of the checksums file
  -nc, --no-checksum   Do not check the sha checksums of the .deb files
  -d, --debug          Show debug information, all internal command's echo their output
  --rc                 Also include release candidates
  --yes                Assume yes on all questions (use with caution!)
How to recover from a broken kernel installation
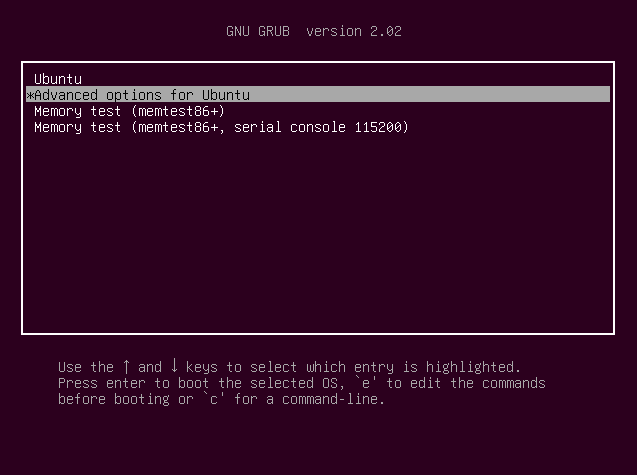
In case your computer boots to a black screen, freezes or something is not working after upgrading the kernel, reboot and select Advanced options for Ubuntu from the GRUB menu:
Then select the previous kernel version and hit
Enter:No matter the reason, you'll need to boot to a previous kernel version if you want to uninstall the latest kernel. That's because you can't remove a kernel that's currently in use.
In case you can't see the GRUB2 menu, press and hold the
Shift or press the Esc key repeatedly (this can vary depending on BIOS or UEFI boot and on the Ubuntu / Linux Mint version you're using) key when GRUB loads. The Grub menu should show up, allowing you to select the previous kernel version.As a side note, Ukuu can set the GRUB menu to be displayed during boot without having to press on any key, by setting the GRUB menu timeout in its settings.
After booting to the previous kernel, you can remove the faulty kernel. Both Ukuu and ubuntu-mainline-kernel.sh allow removing kernels installed from the Ubuntu kernel PPA.
To remove a kernel using Ukuu, select the Linux version you want to remove and click the
Remove button.With ubuntu-mainline-kernel.sh, you can uninstall a kernel version by running:
ubuntu-mainline-kernel.sh -u VERSIONWhere version is the kernel version, e.g. 4.9. You may also run it with
-u without specifying a version, in which case the tool will list up to 10 kernel versions and ask you which one you'd like to remove. It's worth to note that ubuntu-mainline-kernel.sh won't list official Ubuntu kernels.


