How To Create A Wi-Fi Hotspot In Ubuntu 18.04 / Gnome (And Edit Its Settings)
You can use your Linux desktop to share your wired Internet connection wirelessly, by creating a Wi-Fi hotspot. This allows your computer to act like a wireless router, allowing other devices to connect to the Internet via its Wi-Fi.
Note that using these instructions you will NOT be able to use the same wireless network to both connect to the Internet and create a hotspot. Your need a wired Internet connection and an unused Wi-Fi on the same machine.
This articles shows how to create an a Wi-Fi hotspot on the Ubuntu 18.04 Gnome desktop, and how to edit its settings (change the password, SSID, etc.), a feature that's hidden from the settings and menu. The hotspot uses infrastructure mode (the Wi-Fi mode will be set to "Hotspot") by default, which allows sharing the Internet connection with Android devices.
1. To create a Wi-Fi hotspot, the first thing you'll need to do is to turn on your Wi-Fi (if not already enabled):
This is done by going to the System menu and selecting
2. Next, select
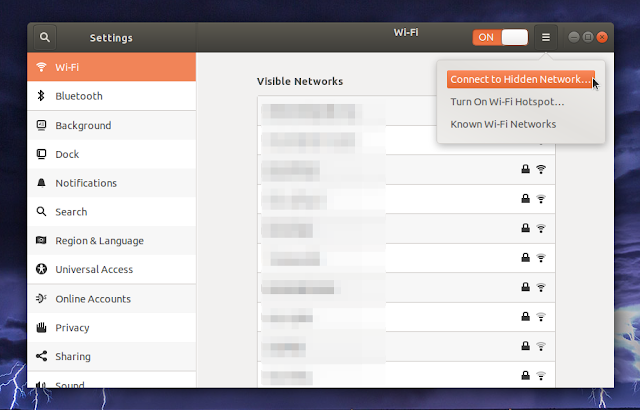
3. In the Wi-Fi Settings window, click on the Gnome menu icon from the window upper right-hand side corner, and select
Your new Wi-Fi hotspot uses AP (infrastructure) mode by default in Ubuntu 18.04, and the network SSID and password, as well as the security type (WPA/WPA2 is used by default in Ubuntu 18.04) are presented on the next screen - which is displayed immediately after your enable the Wi-Fi hotspot:
If you are ok with the defaults and don't want to change anything, that's all you have to do to create a Wi-Fi hotspot in Ubuntu 18.04.
You won't find any options to change these defaults though, at least not in this settings pane. If you want to change some of the hotspot settings, like the network SSID and password, there are two ways of doing this, which I'll explain below.
Option 1: Edit the hotspot configuration file.
After creating a hotspot for the first time, a file called
In this file you can configure the network SSID (it appears as
After making changes to the Hotspot file, save it (to save the file in Nano command line text editor, press
After making changes to the hotspot configuration file you'll need to restart Network Manager:
Option 2: NM Connection Editor.
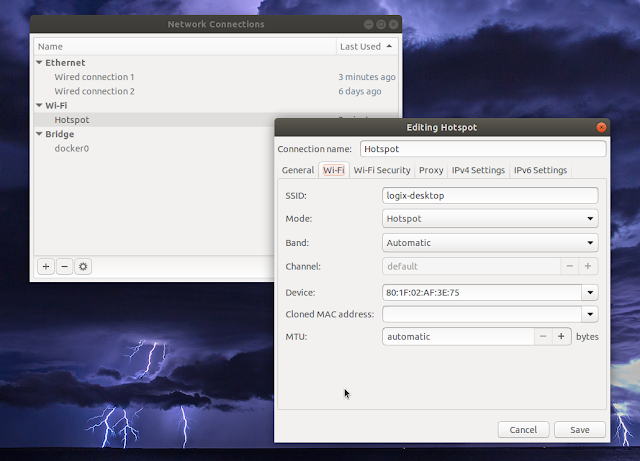
This tool lets you modify the hotspot Wi-Fi mode, band (choose between 2.4 Ghz and 5 Ghz if available), and more. You can start it by pressing
If you use nm-connection-editor in Ubuntu 18.04 to change the hotspot password and you use the default WPA & WPA2 Personal security, devices may not be able to connect to your hotspot, displaying an authentication / incorrect password error. At least this is how it worked in my case, using Ubuntu 18.04 to create the hotspot and an Android phone to connect to it.
I'm not sure why this happens when using NM Connection Editor, but the issue is not present if you edit the hotspot configuration manually. This is why I don't recommend using NM Connection Editor to change a WPA/WPA2 hotspot password. Do it from the command-line instead (option 1, which doesn't cause any issues).
After making any changes using
It's important to note that in both cases, to make sure all settings are preserved, only start a hotspot by selecting
This way your custom Wi-Fi SSID is used, as you can see in the screenshot. Selecting
Note that using these instructions you will NOT be able to use the same wireless network to both connect to the Internet and create a hotspot. Your need a wired Internet connection and an unused Wi-Fi on the same machine.
This articles shows how to create an a Wi-Fi hotspot on the Ubuntu 18.04 Gnome desktop, and how to edit its settings (change the password, SSID, etc.), a feature that's hidden from the settings and menu. The hotspot uses infrastructure mode (the Wi-Fi mode will be set to "Hotspot") by default, which allows sharing the Internet connection with Android devices.
How to create a Wi-Fi hotspot in Ubuntu 18.04 using Gnome desktop
1. To create a Wi-Fi hotspot, the first thing you'll need to do is to turn on your Wi-Fi (if not already enabled):
This is done by going to the System menu and selecting
Wi-Fi Off > Turn On.2. Next, select
Wi-Fi Settings from the system Wi-Fi menu:3. In the Wi-Fi Settings window, click on the Gnome menu icon from the window upper right-hand side corner, and select
Turn On Wi-Fi Hotspot:Your new Wi-Fi hotspot uses AP (infrastructure) mode by default in Ubuntu 18.04, and the network SSID and password, as well as the security type (WPA/WPA2 is used by default in Ubuntu 18.04) are presented on the next screen - which is displayed immediately after your enable the Wi-Fi hotspot:
If you are ok with the defaults and don't want to change anything, that's all you have to do to create a Wi-Fi hotspot in Ubuntu 18.04.
You won't find any options to change these defaults though, at least not in this settings pane. If you want to change some of the hotspot settings, like the network SSID and password, there are two ways of doing this, which I'll explain below.
How to change Wi-Fi hotspot settings in Ubuntu 18.04 (Gnome desktop)
Option 1: Edit the hotspot configuration file.
After creating a hotspot for the first time, a file called
Hotspot is created in /etc/NetworkManager/system-connections, which holds some settings. So make sure to create a hotspot first, or else this file does not exist! You can then edit the configuration file with a text editor, for example Nano, like this:sudo nano /etc/NetworkManager/system-connections/HotspotIn this file you can configure the network SSID (it appears as
ssid= under [wifi]), password (the Wi-Fi password is the value of psk= under [wifi-security]), and other settings.After making changes to the Hotspot file, save it (to save the file in Nano command line text editor, press
Ctrl + O, then Enter, and then exit using Ctrl + X).After making changes to the hotspot configuration file you'll need to restart Network Manager:
sudo systemctl restart NetworkManagerOption 2: NM Connection Editor.
This tool lets you modify the hotspot Wi-Fi mode, band (choose between 2.4 Ghz and 5 Ghz if available), and more. You can start it by pressing
Alt + F2 or opening a terminal and typing:nm-connection-editorIf you use nm-connection-editor in Ubuntu 18.04 to change the hotspot password and you use the default WPA & WPA2 Personal security, devices may not be able to connect to your hotspot, displaying an authentication / incorrect password error. At least this is how it worked in my case, using Ubuntu 18.04 to create the hotspot and an Android phone to connect to it.
I'm not sure why this happens when using NM Connection Editor, but the issue is not present if you edit the hotspot configuration manually. This is why I don't recommend using NM Connection Editor to change a WPA/WPA2 hotspot password. Do it from the command-line instead (option 1, which doesn't cause any issues).
After making any changes using
nm-connection-editor, you'll need to restart Network Manager:sudo systemctl restart NetworkManagerIt's important to note that in both cases, to make sure all settings are preserved, only start a hotspot by selecting
Turn On Wi-Fi Hotspot... from the Wi-Fi System Settings once. Use the Connect to Hidden Network... option for subsequent uses, then select the connection named Hotspot and click Connect:This way your custom Wi-Fi SSID is used, as you can see in the screenshot. Selecting
Turn On Wi-Fi Hotspot... sets your hotspot SSID to your hostname each time it's used, and may reset other settings.


