How To Upgrade To Ubuntu 18.04 LTS (Bionic Beaver)
The Ubuntu 18.04 LTS is getting close, with the official release date being April 26. Because the servers are very slow around the release date, I prefer to upgrade a bit earlier. If you can't wait and want to upgrade from Ubuntu 16.04 or 17.10 to Ubuntu 18.04 LTS, here's how to do it.
You'll need to be aware though that Ubuntu 18.04 is not considered stable yet, so there might still be issues!
Update: these instructions also work for upgrading from Ubuntu 18.04 LTS to Ubuntu 18.10 (Cosmic Cuttlefish).
To upgrade from Ubuntu 16.04 LTS or 17.10 to Ubuntu 18.04 LTS (Bionic Beaver) in the standard (and recommended) way, follow the steps below.
1. Make sure all packages are up to date. To do this, simply run Software Updater and install any available updates.
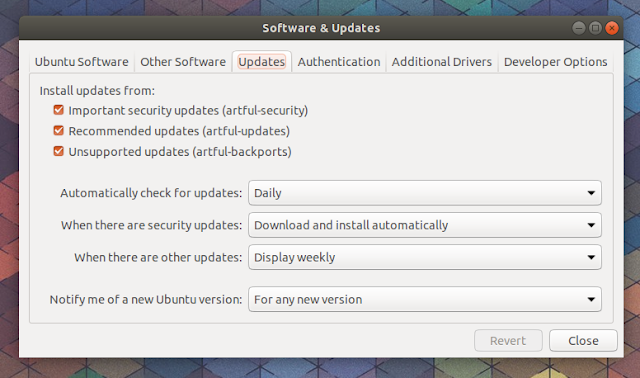
2. Open "Software & Updates" from the menu (it can also be launched from Ubuntu Software menu) and on the "Updates" tab, make sure the "Notify me of a new Ubuntu version" option is set to "For any new version":
Without this, you may get an "Upgrades to the development release are only available from the latest supported release" error.
3. Press Alt + F2 and type the following command:
The following dialog should be displayed:
Click "Upgrade" and follow the instructions. After it completes you should have the latest Ubuntu 18.04 LTS (Bionic Beaver).
In case you are not prompted to upgrade to the latest Ubuntu 18.04 LTS (Bionic Beaver), use the following command to force a new release check:
While the standard way of upgrading to a newer Ubuntu release is the method mentioned above, I for one have always prefered using the command line for this - even on my desktop -, because you can easily see any issue that may arise, which makes it easier to fix (and easier to search for a fix).
This is not for everybody though, so use this if you have some experience with the command line or else there's no value in it. Seeing what's broken doesn't matter if you don't know how to fix it or at least find a fix online and apply it.
To upgrade to Ubuntu 18.04 LTS (desktop or server) from the command line, type the following command:
When asked if you want to continue, type "y" and then ENTER:
If you want to cancel the upgrade procedure, don't press Ctrl + C after running the command above, because your repositories will point to Ubuntu 18.04! Instead, press "N" when prompted to abort.
You'll need to be aware though that Ubuntu 18.04 is not considered stable yet, so there might still be issues!
Update: these instructions also work for upgrading from Ubuntu 18.04 LTS to Ubuntu 18.10 (Cosmic Cuttlefish).
Upgrade to Ubuntu 18.04 LTS (desktop) the standard way
To upgrade from Ubuntu 16.04 LTS or 17.10 to Ubuntu 18.04 LTS (Bionic Beaver) in the standard (and recommended) way, follow the steps below.
1. Make sure all packages are up to date. To do this, simply run Software Updater and install any available updates.
2. Open "Software & Updates" from the menu (it can also be launched from Ubuntu Software menu) and on the "Updates" tab, make sure the "Notify me of a new Ubuntu version" option is set to "For any new version":
Without this, you may get an "Upgrades to the development release are only available from the latest supported release" error.
3. Press Alt + F2 and type the following command:
update-manager -cdThe following dialog should be displayed:
Click "Upgrade" and follow the instructions. After it completes you should have the latest Ubuntu 18.04 LTS (Bionic Beaver).
In case you are not prompted to upgrade to the latest Ubuntu 18.04 LTS (Bionic Beaver), use the following command to force a new release check:
/usr/lib/ubuntu-release-upgrader/check-new-release-gtkUpgrade to Ubuntu 18.04 LTS (desktop or server) from the command-line
While the standard way of upgrading to a newer Ubuntu release is the method mentioned above, I for one have always prefered using the command line for this - even on my desktop -, because you can easily see any issue that may arise, which makes it easier to fix (and easier to search for a fix).
This is not for everybody though, so use this if you have some experience with the command line or else there's no value in it. Seeing what's broken doesn't matter if you don't know how to fix it or at least find a fix online and apply it.
To upgrade to Ubuntu 18.04 LTS (desktop or server) from the command line, type the following command:
sudo do-release-upgrade -dWhen asked if you want to continue, type "y" and then ENTER:
If you want to cancel the upgrade procedure, don't press Ctrl + C after running the command above, because your repositories will point to Ubuntu 18.04! Instead, press "N" when prompted to abort.


